Typhoon Preparation

Overview

Typhoons are a large storm system characterized by a spiral or circular pattern of violent winds. In the Atlantic and eastern Pacific Oceans, these storm systems are referred to as hurricanes. In the Indian Ocean, they become tropical cyclones. In the Western Pacific Ocean, which includes Japan, these storms are called typhoons (taifu たいふう 台風).

Typhoon Information

The Regional Specialized Meteorological Center (RSMC) in Japan uses a Tropical Cyclone Intensity Scale which is as follows:

  • Tropical Depression: wind speeds lesser than 61 km/h (37 mph)
  • Tropical Storm: wind speeds between 62-88 km/h (38-54 mph)
  • Severe Tropical Storm: wind speeds between 89-117 km/h (55-72 mph)
  • Typhoon: wind speeds between 118-156 km/h (73-97 mph)
  • Strong Typhoon: wind speeds between 157-193 km/h (98-120 mph)
  • Violent Typhoon: wind speeds higher than 194 km/h (121 mph)

With one-third of the world’s tropical cyclones forming in the western Pacific, this area is the most active on Earth. However, these storms follow different tracks, meaning that they do not always make landfall or they make landfall in different places.

Typhoons in Okinawa

Due to its southern location, Okinawa Prefecture experiences an annual average of seven to eight tropical storms between the months of May to September. Thankfully, many of these storms do not reach the classification of typhoon and cause very little damage. Okinawa does, however, occasionally experience strong storms.

In August 2023, Typhoon Khanun battered several islands in Okinawa as well as the countries of China, Korea, and Russia. Typhoon Khanun, categorized as a Strong Typhoon (Category 4-equivalent hurricane on the Saffir-Simpson scale), left 30% of Okinawa residents without electricity and many without running water. While not all typhoons are this severe, there are several things all OkiJETs are encouraged to do to prepare:

Before Typhoon Season Starts

Number 1: Emergency grab bag

Before typhoon season starts, prepare an emergency grab bag (this bag can also serve in the case of other emergencies). While these types of bags can be purchased through Amazon, you can also make your own using supplies found at Daiso. Basic items should include:

  • Basic First Aid Kit
  • Scissors
  • Rain Poncho
  • Work Gloves
  • Flashlight & Spare Batteries
  • Garbage/Waste Bags

When finished assembling your emergency grab bag, please place it in an easily accessible location.

number 2: work contact

Knowing who to contact at each of your schools can be of great assistance in case of emergency. Because many students walk to school, classes will often be canceled for their safety if a typhoon is predicted to be strong. However, this does not mean that work is canceled. While staff members have the option of using their paid time off (PTO, nenkyu), special leave (tokyu) is only granted if the buses stop running. Because this can be hard to track, it is highly recommended that you get the contact information of someone at work who can help keep you informed. This person may be your supervisor, coordinator, a JTE, or a school office staff member.

Please note that work may grant special leave (tokyu) for other storm-related problems, such as power outages in the area, downed trees, or flooding. Because of this, you may get special leave, but other OkiJETs may not be in the same position.

number 3: emergency exit and evacuation routes

While evacuation orders are rare, it is important that you familiarize yourself with the emergency evacuation location(s) in your area. This information should have been given to you upon registering at your local town/city hall. If you do not remember the location, please check the official website for your town/city. During an emergency, you may not have access to your car or your cell phone, so it is important that you can reach this location on foot by memory.

Depending on your apartment, you may have an emergency escape. This emergency escape may be through your balcony or around the side of your building. Familiarize yourself with the escape route ahead of time. This also holds true at your workplace. If you work at a school, you may be able to participate in the annual emergency drills. If you work elsewhere or are not able to participate in a drill, please ask around for this information.

As a Typhoon Approaches

Number 1: Supplies

Since many typhoons are predicted a week in advance, plan to buy supplies before the typhoon arrives. As everyone else will also be buying supplies at the same time, we recommend going earlier to ensure you can find what you want. The best option, of course, is to always have these items on hand to avoid looking for them at the last minute.

  • Cash
  • Water Bottles
  • Groceries (ready-to-eat foods, canned foods, instant ramen, snacks)
  • Necessary Medications
  • Candles
  • Hand Fans (in case of power outage)
  • Spare Batteries

For outer-island JETs, it may be a few days before the supply boats resume their normal schedule after a typhoon passes. Before the typhoon comes, be sure to bulk buy any perishable foods that you think you may need.

number 2: Car preparation

If you own a car, plan to go to the gas station. Because of the strong winds associated with typhoons, empty cars can be knocked over. Filling your car with gas will help weigh it down and prevent this from happening. Please note that gas stations become increasingly busy as typhoons approach, so aim to fill your tank sooner rather than later.

Number 3: Apartment preparation

While many of the typhoons that strike Okinawa are not a great cause for concern, taking basic precautions is strongly recommended. This is especially true if you are planning on taking a trip during the typhoon season. Remember that insurance does not cover for negligence.

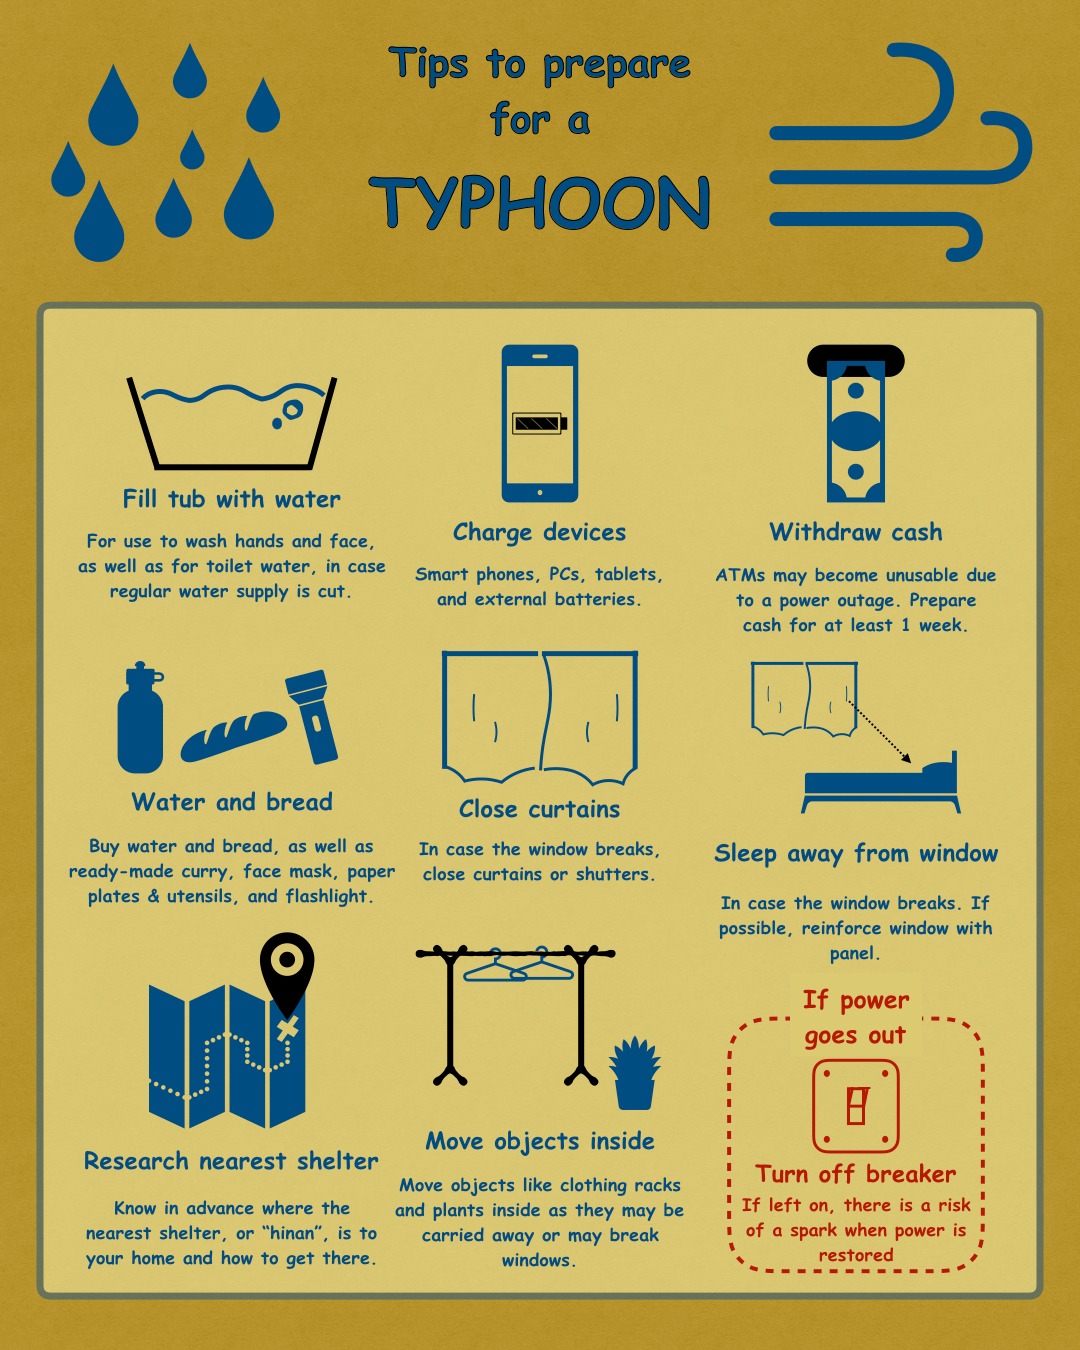
  • Bring in everything from outside
    • Due to the strong winds of a typhoon, things not properly tied down may be carried off or knocked down and broken. For safety, it is best to bring in everything that you can.
  • Prep outside things that cannot move
    • For things that cannot be moved, such as an outdoor washing machine, please prepare them as best as you are able.
  • Outdoor washing machines should be covered and then taped. The cover will also help protect your machine from getting dirty. Covers can be bought online through Amazon or at stores such as Makeman. In addition, the recommended tape for typhoon preparation is yojo tape (ようじょう 養生テープ). This tape can also be found on Amazon or at Makeman. When using this tape, please be careful as it is extremely sticky and will leave hard-to-clean streaks.
  • For more information, read this Japanese article: 外置き洗濯機
  • Fill your bathtub with water
    • While rare, water supply can be cut during a typhoon. Filling up your bathtub ensures you have water to flush your toilet and wash up.
  • Close all doors and windows
    • It is important that you close all the doors, windows, and curtains in your apartment, especially if you are planning to take a trip during typhoon season.
    • If you have storm shutters, be sure to close those as well.
    • For extremely strong typhoons, you can also tape your windows to strengthen the glass against gusts. For most typhoons, however, this is not necessary.
  • Lay down newspaper
    • While properly closing all doors and windows will prevent most water from entering, it is recommended that you stuff newspaper into the cracks to help soak up any extra leakage. If you do not have enough newspaper, you can also use spare towels.
Number 4: Prepare activities

Because typhoons can last for a few days, we recommend preparing some activities that can keep you occupied while you stay sheltered.

  • Charge all devices
  • Download/rent/buy some books
  • Download/rent/buy some movies
  • Buy a card game
  • Prepare Japanese study materials

During a Typhoon

While there isn’t much to do during a typhoon besides wait, remember to stay aware of your surroundings in case the situation changes. Refresh news pages every so often for updates, and consider staying in touch with those in your immediate area to know what’s going on beyond your door.

Typhoon Resources include:

Japan Meteorological Agency | RSMC Tokyo – Typhoon Center (jma.go.jp)

Japan Weather Forecast | NHK WORLD-JAPAN News

【NHK】台風情報|最新の進路予想図や台風の勢力・接近情報

In the event that communication lines are downed, the major cell phone carriers in Japan have created emergency message boards that allow you to leave record of your location and your status:

Docomo Disaster Alerts
SoftBank Disaster Alerts

After a Typhoon

Number 1: Clean up

After a typhoon passes, it is important to clean up and assess any damage that might have occurred. Be sure to report any damage to your supervisor or coordinator so they can help you contact your rental agency if need be.
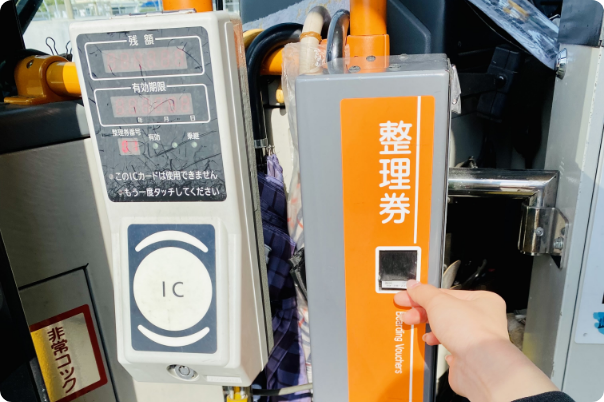
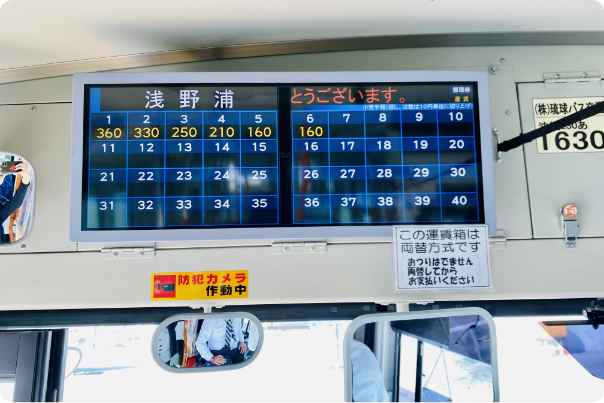
Image Credit: 1,2

Driver’s License Renewal

Your first Japanese driver’s license will be valid for around 3 years. It will expire on your 3rd birthday after receiving it, and it will be valid until one month after that. Make sure you check the date on your license. Japan is very nice in that they will send you a notification postcard to renew your license one month before it expires. However if you moved during this time and did not change the address on your license, you will not receive this postcard, so be careful. You may apply for the renewal from one month before until one month after the expiration date.

Locations:

Okinawa Driver’s License Center (沖縄県運転免許課)
沖縄県豊見城市字豊崎3番22
Okinawa-ken, Tomigusuku-shi, Aza Toyosaki 3-22
Phone: 098-851-1000

Driving School Chubu Campus (安全運転学校の中部分校)
〒904-0035 沖縄県沖縄市南桃原4丁目27-22
Okinawa-ken, Okinawa-shi Minami Tobaru 4-27-22
Phone: 098-933-0442

Driving School Hokubu Campus (安全運転学校の北部分校)
〒905-0021 沖縄県名護市東江5-20-5
Okinawa-ken, Nago-shi, Agarie 5-20-5
Phone: 0980-53-1301

Driving School Miyako Campus (安全運転学校の宮古分校)
〒906-0013 沖縄県宮古島市平良下里3107-4
Okinawa-ken, Miyako-jima, Miyako-jima-shi, Tairashimosato 3107-4
Phone: 0980-72-9990

Driving School Yaeyama Campus (安全運転学校の八重山分校)
〒907-0003 沖縄県石垣市平得343-2
Okinawa-ken, Ishigaki-shi, Hirai 343-2
Phone: 0980-82-9542

Specified Police Stations (Kumejima, Kita Daito, Minami Daito, Aguni, Tonaki, Tokashiki, Zamami, Ie, Izena, Iheya, Yonabaru)

Documents:

1. Drivers License
2. Residence Card
3. Renewal Notification Postcard
4. 3 cm x 2.4 cm picture (you can get this at the location)
5. Application Form (you will receive this at the location)
6. Certificate of Residency (make sure you order the one with 本籍)
7. 3,850 yen

Hours

Application Period:
(Monday – Friday) 8:30 – 11:30 / 13:00 – 16:45
(Sunday) 8:00 – 11:30 / 13:00 – 16:45

Process:

Step 1. Turn in all the documents to the counter. You will need to answer a questionnaire regarding your health and driving history.

Step 2. After your application is in order you will go to another window to pay.

Step 3. Next is the eye check. This is the same process as when you applied for your license.

Step 4. Next you will go to counter 1 for the last check and then they will send you to finalize the license and receive a slip with information on your lecture time.

Step 5. Finally you will go to another room to get your picture taken. Afterwards they will hold onto your application while you head to your lecture.

Step 6. There are 4 different sections for the lectures so make sure you go to the right one.
– Beginners license holders – 2 hours
– Regular license holders – 1 hour
– Drivers with violations – 2 hours
– Exemplary driver – 30 min

After the end of the lecture they will call out your name to pick up your license. Check the name, address and birth date. Afterwards be sure to turn in your lecture slip and you are finished.

Japanese Driver’s License

The PAs cannot be held responsible for any issues you may face regarding your license. The following information is for reference only and it is your own responsibility to clarify any doubts you may have with the driver’s license center.

Once you have re-contracted for a second year, one of the most important things that you must do is change your existing driver’s license over to a Japanese license. You MUST change over your license BEFORE your International Driver’s Permit (IDP) expires. Japan immigration law permits an IDP valid for 1 year upon entrance into Japan. After one year, you must be out of the country for three months in order to obtain another valid IDP. *Outer Islanders (including Miyako and Ishigaki/Yaeyama): You must make arrangements to come to Naha to apply for a Japanese license but you will have special privileges that will allow you to finish the process in one day.

Also note that driving is NOT a requirement of the ALT position and therefore all costs and procedures required to obtain a Japanese license is the responsibility of the JET.


Step 1: Translating Your Original License

The Japan Automobile Federation (JAF) will translate your license into Japanese. You can either go in person to the office branch in Urasoe City or you can ask for the translation by mail. Please note that if your Driver’s License was issued in Arabic or Russian, or issued from certain countries including the Republic of Korea, the Kingdom of Thailand, or the Union of Myanmar, you will also need to bring your Alien Registration Card (or send a clear photocopy of both sides of your card). It will take two to three weeks for translation of License issued from these countries.

Japan Automobile Federation (JAF)

〒901-2102 Okinawa-ken, Urasoe-shi, Maeda 1-48-7

〒901-2102 沖縄県浦添市前田1-48-7

TEL: 098-877- 9225

Open 9am – 5:30pm, Mon – Fri

(1) By Mail (takes roughly 1 week) – Send by registered mail (現金書留 genkin kakitome) the following to the JAF Branch:

  • Application form – can be downloaded from the JAF website
  • Photocopies of the FRONT and BACK of your Original Driver’s Licence, with the issue date clearly noted
  • 3,380 yen (3,000 yen application fee + 380 yen for return postage) Sending by registered mail will allow you to pay this fee at the time of sending.

(2) In Person (translation takes about 1 hour) – Go to the JAF Office Branch in Urasoe City with the following:

  • Original Driver’s License
  • If Necessary, your driver’s record
  • 3,000 yen processing fee

Directions to JAF Okinawa: The JAF office is just south of the Nishihara Iriguchi intersection where the 38 crosses the 241. Directions to Nishihara Iriguchi (西原入口):

  • From the 58: At the (Gusukuma) 城間 intersection (near the Pizza House restaurant), turn onto Sun Park Road (サンパークロード) towards Ahacha (安波茶).Go straight (Route 38 will adjoin), pass over the 330. You will pass the Urasoe City Hall (浦添市役所)on your right, the Urasoe Police Station (浦添警察署) and the Urasoe Fire Station (浦添消防署) on your left, and the former JAF office on the left. After going down part of a steep hill, at the Nishihara Iriguchi (西原入口) intersection turn right on the 241 toward Ishimine (石嶺).
  • From the 330 (north): going north: Just shy of a kilometer past the first tunnel, exit to the left for the Koei intersection. Turn right on the 241 to go past Barclays Court. Continue straight on the 241 for about two kilometers. Pass straight through the Nishihara Iriguchi intersection.
  • From the expressway: Exit at the Nishihara interchange, pay your toll, and take the road to the left to merge with the 330 southbound. Continue the next directions.
  • From the 330 going south: After the Nishihara interchange with the expressway, exit to the left for the Koei intersection. Turn left on the 241 to go past Barclays Court. Continue straight on the 241 for about two kilometers. Pass straight through the Nishihara Iriguchi intersection.
  • From the Nishihara Iriguchi intersection: Going south on the 241, go up the hill. After the first traffic light (with a Family Mart on the left), you should notice the JAF office on the right by the tow trucks parked in front.

Step 2: Application Process

The only place that will transfer a foreign license to a Japanese license in Okinawa is the Okinawa Driver’s License Center (沖縄県運転免許課 Okinawa-ken Unten Menkyo-ka) that relocated to Toyosaki, near the Ashinibanaa Outlet Mall by Tomiton in January 2011. The application process should only take the morning but it may take the full day if you arrive late. The Licensing Center has also requested that all forms be turned in between 8:30am ~ 11:00am (Monday through Friday) as it takes some time to process.

There is only one staff member responsible for handling foreign license transfers (外免切替担当さんgaimen kirikae tantou-san), so please call ahead and confirm that the staff member is available on the day that you plan to go to the License Center. The phone number is 098-851-1000.If you are unable to make it during the morning hours (8:30 ~ 11:00 AM), please call ahead and inform the Center. Please be aware that there may not be any English speakers available to assist over the phone or at the Center so it may be helpful to go with a Japanese speaker.

Okinawa Driver’s Licence Center (沖縄県運転免許課)

沖縄県豊見城市字豊崎3番22

Okinawa-ken, Tomigusuku-shi, Aza Toyosaki 3-22

Phone: 098-851-1000.

From the Naha Bus Terminal, you can take Bus number 55, 56, 88, or 98. You will need to get off at the Michi no Eki Toyosaki (道の駅豊崎) stop.

Necessary Documents

  1. Passport
    • The passport is used as a means to verify that, for at least three months, you have lived in the country where your license was issued. However, in order for it to be considered adequate proof, it will need to have the necessary stamps showing the exact dates of entry and departure from that country. Many US States do NOT stamp US passports and thus, some US ALTs may NOT be able to use their passport as adequate proof. In that case, other official documentation may be used (ie. tax forms, college transcripts, etc.), as long as they display the exact dates of entry and departure from the country where the license was issued. This can be the most strenuous part of the process as it can be difficult to prove you were at home during the necessary time. Take care to leave enough time to get documents from home if need be. I would recommend against saying you have an old passport, by the way. Once the clerk hears this, he will demand to see it as it will make his life easier. But finding it at home and waiting for it to arrive could take some time. Try to use school documents or tax returns instead.
  2. Residence Card (在留カード Zairyuu Kaado)
  3. Certificate of Residency (住民票 Juuminhyou)
    • Can be obtained from your town office/city hall for about 300円
  4. Valid Driver’s License from your home country. – please be sure that the Issue Date on your license is dated AT LEAST 3 months prior to your entry to Japan (ie. If you were in Group A, the issued date on your original license should be before the end of April of your arrival year).
    • If your license does not show a date of issue or if the date of issue is less than 3 months prior to entering Japan due to license renewal, you will need to obtain a driving record (driver’s record – a judiciary document stating when your license was first issued) that shows the original issue date of your license. You may obtain this record from the Department of Motor Vehicles in your home state/territory.
  5. An Official Translation of your home countries driver’s license from JAF, for example.
    • If you also have a driving record/driver’s record, you must have this translated as well.
    • NOTE: If you are transferring more than one type of license (ex. Driving and Motorcycle), you need two separate sets of paperwork for each including translation, pictures, and residence certificate.
  6. Two identical photos (3cm x 2.4cm). This can be obtained inside the licensing.
  7. 5,000円 (depending on your citizenship and license type, the processing fee will vary, but is usually 2,400yen. Canadian license transfers are 4,500円).

Process

  1. With all of the necessary documents, go to Desk #10 and submit all of the required documents to the staff member handling foreign licence transfers (外免切替担当さん Gaimen Kirikae Tantou-san). You will fill out two question sheets about your health and driving history. You will also pick out two sets of four digit PIN codes for your new ID card. They can be the same numbers, twice.
  2. Once your name has been called (or someone will approach you), you will be given a small bundle of papers and instructed to go to the Counter #6 Most likely the clerk will walk you there himself.
  3. Immediately after, you will pay the license application fee of 2,400 yen (normal licence). Depending on the type of license you are applying for (as well as the country of the original license), the fee may be more expensive
  4. After paying, you will be instructed to go to the eye test next to Counter #10
  5. After passing the eye exam, head to Counter #2 to do the final paperwork. You will also receive a copy of your written test confirmation which will allow you to take the written test.
  6. If you are from a country that does not need to take the written test (see list below,) you will be signed up for the next available mandatory safety lecture and then be told to have your photo taken. See below for further instructions and information on the mandatory lecture.
  7. If you are from a country where you must take the written test, you will then be instructed to come back the next Wednesday at 10:30 AM to Counter #9 to register to take the written test.
  8. Eye Exam
    • They will first ask you if you know Japanese (in Japanese), although some clerks know English and will let you take the test in English
  9. Know how to say “up (上, Ue), down (下, Shita), left (左, Hidari), right (右, Migi), red (赤, Aka), blue (青, Ao), yellow (黄色, Kiiro).
    • If you cannot memorize these directions and colors in Japanese, gestures are okay and the tester will most likely know the colors in English
    • The eye exam uses the Landolt C Chart. One square on the grid will be highlighted and you will have to tell the tester which direction the break in the circle is facing (up,down, left, right). You will do this for each eye
    • Next, you will be shown 2 lights of varying color and you will have to indicate which color is on the top, and which color is on the bottom – you will do this twice

For Outer Islanders:

  • You must call ahead and to inform the Driver’s License Center when you are coming.
  • You will have to come in and process your application on Wednesday morning in order to be able to take the Written Test and the Practical Skills Test (if applicable) on the same day
  • If you are coming from Miyako or Ishigaki/Yaeyama, and you fail the Practical Skills Test, you will be allowed to re-take the test at your local testing center.

Countries Exempt from the Written & Practical Tests

France, Germany, Switzerland, Italy, Belgium, Netherlands, Luxemburg, United Kingdom, Denmark, Ireland, Greece, Spain, Portugal, Sweden, Norway, Iceland, Finland, Austria, Australia, New Zealand, South Korea, Canada and Holland.

  • Once your application is processed but before you take your photo, you will have to make an appointment to sit through a thirty minute lecture about “safety driving” before receiving your Japanese license. If you process your application later in the day, you may not be able to sit through the lecture given that day as space is given on a first-come-first-served basis. You will then have to reschedule to come back another day to finish the process
  1. When you take your photo, you will be given a slip of paper with your name and PIN code on it. Take this, as well as your confirmation for the lecture you are due to attend, upstairs to the lecture room.
  2. Attend the 30 minute lecture (All in Japanese, do not fall asleep!) and you will be given your new license at the end of the lecture. The lecture runs four times a day, twice before and twice after lunch.
    • Outer Islanders who are exempt from the tests will be able to register to take the 30 minute lecture the same day to receive their license, so long as you call ahead and process everything early that day.
  3. Afterwards, left of the doors to enter and exit, near the Safe Driving Center, is a ID checking machine. If you place your license on it and enter your PIN code, it will confirm your identity. You should do this to be sure of your license before leaving the building.

Citizens from countries not mentioned above

You will need to take both, the written exam and practical driving skills test. Be sure to keep all paperwork you received after you have completed the application process. These will become necessary when taking the Written and Practical Driving Skills Test.


Step 3: Written Test

The written test is offered only on Wednesdays from 11AM. – You must have completed the Application process by Tuesday, before being able to take the Written Test. The fee for the written test is 2,650yen per test (if you fail, you will have to pay this fee again to retake the test).

Necessary Documents

  • Written test confirmation certificate
  • All paperwork you received during the application process.

Process

  1. Arrive before 11AM and submit paperwork and appointment slip to Counter #5
  2. They will then tell you to go the waiting area until you are called. The written test will be administered on the second floor in the adjacent building.
  3. You will then need to complete some simple paperwork. The test proctor will ask whether you want to take the Practical Skills Test in an automatic or manual vehicle (to categorize you for the Practical Skills Test)
  4. You will receive a numbered test voucher
  5. They will mark the test as soon as you finish and hand it in. If you pass, the proctor will stamp your paperwork. Return to Counter #5 (main building) to schedule an appointment for the Practical Skills Test

The Written Test

  • The written test itself is 10 relatively easy True/False questions and takes about 15 minutes to complete
  • Each question is 10 points and a score of 70 is necessary to pass.
  • As traffic signs differ from country to country, it may be a good idea to familiarize yourself with common traffic signs in Japan. (Please refer to you JET Diary for a list of Japanese traffic signs and what they mean.
  • Some example questions are:
    • “It is always acceptable to make a right turn during a red light.” ( False)
    • “The stoplight is green, but a policeman located in the intersection is giving you a stop hand signal. You should ignore the stoplight and obey the policeman.” (True)
    • “Approaching a pedestrian crosswalk with pedestrians crossing or getting ready to cross, you should slow down, stop before reaching the intersection (or at the stop line) and give the pedestrians the right of way.” (True)
    • “You should not park or stop at anytime on this street.” (True)
    • “Automobiles and mopeds are not allowed on this street.” (True)
    • “It is okay to take sleeping pills or have a little bit of alcohol and then drive.” (False)
    • “You must always contact the police in the case of an accident.” (True)

If you are unsure about the written test and would like a “Rules of the Road in Japan” handbook in English (or Portuguese, Spanish, Korean, Chinese, or Persian), visit the JAF website. The handbook is 1,000yen plus postage.


Step 4: Practical Driving Skills Test

The Practical Skills Test is only offered on Wednesdays and Fridays. Appointments are done on a first-come-first-serve basis. You may have to wait a week to a month in order to schedule an appointment for the test.

Fees:

  • 1,600 yen – Vehicle Rental Fee (per test appointment)
  • 2,050 yen – Registration Fee (per test appointment)
  • 2,400 yen – Processing Fee (if you past the test)

What To Wear:

  • Wear comfortable clothing (nothing too loose – it may get caught in the door or handle)
  • Wear shoes – avoid open-toed sandals and high heels

Taking the Test:

  • Sign in for the test starts at 1 PM.
  • Go to Counter #5 – they will direct you to the Fees Processing Center to pay the test vehicle rental fee (1600 yen) and the test registration fee (2050 yen)
  • Return to Counter #5 with the stamped formed. You will be directed to the waiting room (downstairs from where the written test was administered)
  • Attendance will be taken and everyone will be assigned an order in which they will take the test
  • You will sit in the backseat of the car to watch the person ahead of you take the test
    • This will allow you to view the course and see what the person ahead is doing
    • After the end of the person’s test, you will be asked to leave the car while the examiner explains whether or not the test-taker has passed and what they were marked down for
  • Once that person exits the car, wait for the signal from the examiner before entering the car.
    • Remember that you are being scored as you approach and enter the car
    • The person after you will also enter the car and sit in the back seat while you take your test.
  • If you fail the test, you must wait a minimum of 10 days before re-taking the test.
    • Making an appointment or rescheduling is not possible over the phone and must be done in person. You will have to pay a processing fee even if you fail the test.
  • If you pass the test, report to Counter #1 and pay a License Processing Fee of 3,100yen at the Fees Processing Center.
  • Report to Counter #10 to take your picture for your License (remember, Japanese-style means no smiling).
  • You will receive a paper slip with a number on it. You must keep this paper in order to pick up your license.
  • You must then report to the Driver Safety Education Center for a one hour lecture.
    • After the lecture, the proctor will call out each person’s number. Write your name on the piece of paper and give it to the proctor to receive your license.
  • As you exit the room, license holders can be purchased for 1000 yen. Please remember that this is optional. (Proceeds go towards promoting driver safety programs in Okinawa)

Ishigaki/Yaeyama and Miyako JETs who fail the Practical Skills Test must take all the paperwork back with them. You can then schedule to re-take the Practical Skills Test at your local Driver’s Licensing Center. Other Outer Islanders must re-take the test in Naha.

Miyako Safety Driver License Education Center

〒 906-0013 Miyakojima-shi, Taira Shimozato 3107 – 4

〒906-0013 宮古島市平良下里3107番地の4

TEL:0980-72-9990

Yaeyama Safety Driver License Education Center

〒 908-0003 Ishigaki-shi, Aza-Hirae 343 – 2

〒907-0003 石垣市字平得343番地の2

TEL:0980-82-9542


Practical Driving Skills Test: Automatic

Be sure that you are familiar with the course before taking the test. The tester will tell when and where to turn, but it helps to know beforehand. Be sure to follow these tips exactly, and over-exaggerate them to let the tester know that you are doing them, especially the directions for “Approaching the Vehicle”.

Approaching the Vehicle

  1. Check in front, behind, and underneath the vehicle for children/people.

Entering the Vehicle

  1. Check all traffic, especially from the rear of the vehicle.
  2. After getting into the vehicle, ensure that nothing is in the way before shutting the door.

Adjusting the Seat

  1. Adjust the seat so that your knees are slightly bent when your foot is on the pedals.
  2. Adjust the seat so that your elbows are slightly bent when your hands are on the steering wheel.
  3. Fasten your seatbelt (check for twisting of the belt)

Starting the Engine

  1. Step on the brake pedal.
  2. Visually check the position of the gas pedal.
  3. Visually check the handbrake.
  4. Visually check that the gearshift lever is in the “P” position.
  5. Step on the brake pedal.
  6. Start the engine.

Pulling Out

  1. Step on the brake pedal.
  2. Visually check that the gearshift lever is in the correct position (“D” or “R”).
  3. Release the handbrake.
  4. Signal your departure.
  5. Check traffic in all directions (using your mirrors also).
  6. Lightly step on the gas pedal.

Braking

  1. Release the gas pedal slowly to slow down.
  2. Lightly step on the brake and increase pressure until you reach the required degree of braking.
  3. On slippery road surfaces, step on the brake several times.

Straightaways

  1. The tester will ask you to bring the car’s speed up to 40 km/hour.
  2. Step on the gas pedal and get the car up to that speed as quickly as you can (the tester is timing you).
  3. You will be asked to repeat this on the second straightaway.

Curves

  1. As you approach the curve, check your mirrors and your blind spot (the tester calls checking your blind spot “sidechecking”).
  2. Take your foot off of the gas pedal.
  3. As you take the curve, pump the brake pedal 2-3 times with medium pressure.
  4. Once you have left the curve, put your foot back on the gas pedal and continue driving.

Turning

  1. Drive slowly along the side of your lane that corresponds to your turn (right side for right turn, left side for left turn).
  2. Lightly step on your brakes.
  3. Signal about 30 meters before the place where you will turn.
  4. Check traffic by checking your rear view mirror, side mirror, and blind spot.
  5. Turn.

Stopping at Stop Signs and Stoplights

  1. Brake properly (see “Braking” section).
  2. Maintain firm pressure on the brake pedal.
  3. Be sure to stop the car so that the white stopping line is still visible from inside the car.
  4. When stopping at a stop sign, come to a complete stop, wait for 3 seconds, check your mirrors, check traffic in both directions, and then proceed.
  5. When stopping at a stoplight (only if the signal is red), come to a complete stop, wait for the signal to change to green, and then proceed.

Obstructed View

  1. When approaching an intersection with an obstructed view, come to a complete stop before entering the intersection.
  2. After stopping, slowly pull into the intersection, checking traffic in both directions.
  3. Once you are sure that traffic is clear, proceed through the intersection cautiously.

S-curve

  1. The s-curve is not very difficult. Be sure to follow the directions in the “Turning” section when entering the s-curve.
  2. Drive slowly and cautiously through the s-curve, checking your mirrors regularly. There is no time limit here.
  3. Be careful here. If the tires of the car touch the curb at all, you will automatically fail.
  4. When you reach the end of the s-curve, treat it as a stop sign before proceeding.

Crank

  1. The crank can be difficult, but here are a few tips that may help you. Be sure to follow the directions in the “Turning” section when entering the crank.
  2. Drive slowly and cautiously through the crank, checking your mirrors regularly. There is no time limit here.
  3. Be careful here. If any part of the car touches one of the vertical posts, you will fail automatically. If you get into a tough spot on this part of the course, you are allowed to put the car into reverse one time.
  4. When you reach the end of the crank, treat it as a stop sign before proceeding.

Parking

  1. Lightly step on the brakes.
  2. Signal with your indicator.
  3. Check your mirrors and your blind spot.
  4. Pull into the parking space.
  5. Step on the brake pedal firmly. When you brake completely that is considered your stop and you can’t move further up.
  6. Make sure that the front bumper of the car is perfectly lined up with the numbered sign of your parking spot.
  7. When the car has come to a complete stop, set the hand brake.
  8. Put the gearshift lever into the “P” position.

Leaving the Vehicle

  1. Set the hand brake.
  2. Put the gearshift lever in the “P” position.
  3. Turn off the engine.
  4. Check traffic by checking your rear view mirror, side mirror, and blind spot.
  5. Open the door slightly to check if the area is clear.
  6. Open the door slowly.
  7. Exit the vehicle.

Driving Schools in Okinawa

The best way to pass the Practical Driver’s Skills Test is to sign up for classes. Many driving schools around Okinawa offer hourly lessons to assist you with passing the test. Here is a list of certified driving schools around Okinawa:

自動車学校名SCHOOL NAME所在地Address電話受付PHONE NUMBER
今帰仁自動車学校Nakijin Driving School今帰仁村字仲宗根977番地Nakijin-mura, Aza-Nakasone 997(0980)56-2500
名護自動車学校Nago Driving School名護市宮里7丁目24番37号Nago-shi. Miyazato 7-24-37(0980)52-2973
北丘自動車学校Kitaoka Driving Schoolうるま市字昆布1841番地の22Uruma-shi, Aza-Konbu 1841-22(098)972-3188
安ゲ名自動車学校Agena Driving School(Mr. Yagi Seiken – speaks ENG)うるま市字大田30番地Uruma-shi, Aza-Oota 30(098)973-3436
コザ自動車学校Koza Driving School沖縄市松本7丁目18番22号Okinawa-shi, Matsumoto 7-18-22(098)937-3711
川畑自動車学校Kawabata Driving School沖縄市南桃原1丁目22番1号Okinawa-shi, Minamitoubaru 1-22-1(098)933-3946
カデナ自動車学校Kadena Driving School読谷村字楚辺1512番地Yomitan-son, Aza-Sobe 1512(098)956-2363
宜野湾自動車学校Ginowan Driving School宜野湾市字赤道82番地Ginowan-shi, Aza-Sekidou 82(098) 892-2310
第二波之上自動車学校Dai-Ni Naminoue Driving浦添市勢理客1丁目5番1号Urasoe-shi, Serikyaku 1-5-1(098)874-5318
波之上自動車学校Naminoue Driving School那覇市辻3丁目1番1号Naha-shi, Tsuji 3-1-1(098)868-3881
津嘉山自動車学校Tsukazan Driving School南風原町字津嘉山593番地の1Haebaru-cho, Aza-Tsukazan 593-1(098)889-5542
馬天自動車学校Baten Driving School南城市佐敷字津波古509番地の1Nanjo-shi, Sashiki, Aza-Tsuhako 509-1(098)947-6431
糸満自動車学校Itoman Driving School糸満市字糸満2278番地Itoman-shi, Aza_Itoman 2278(098)992-2138
三和自動車学校Miwa Driving School宮古島市平良字下里1104番地Miyakojima-shi, Taira, Aza-Shimozato 1104(0980)72-4578
八重山自動車学校Yaeyama Driving School石垣市字真栄里109番地Ishigaki-shi, Aza-Maezato 109(0980)82-2043
普天間自動車学校Futenma Driving School北中城村字大城480番地Kitanakagusuku-son, Aza-Ooshiro 480(098)935-3355
美池自動車学校Miike Driving School沖縄市字池原2165番地Okinawa-shi, Aza-Ikehara 2165(098)938-0788
牧港ドライビングスクールMakiminato Driving School浦添市牧港5丁目10番1号Urasoe-shi, Makiminato 5-10-1(098)879-1774
天久ドライビングスクールAmeku Driving School那覇市字天久1044番地Naha-shi, Aza-Ameku 1044(098)868-5859
壺川自動車学校Tsubogawa Driving School豊見城市字名嘉地225番地Tomigusuku-shi, Aza-Nakachi 225(098)850-3730
宮古自動車学校Miyako Driving School宮古島市平良字西里1334番地Miyakojima-shi, Taira, Aza-Nishizato 1334(0980)72-9352

There is also a website that JETs nationwide have helped create to assist those who want more information regarding the Foreign License Transfer process. The website is http://www.supermelf.com/japan/ajetdrivingbook/index.htm.

Cars

Unlike mainland Japan public transportation in Okinawa can be difficult, especially if you don’t live around a populous city or live on a remote island. The bus system is manageable but rarely punctual.

Necessary Documents

Before you even start looking for a car you need to have to have these things (Note: If you’ve been in Japan for over a year, you will need to switch over to a Japanese Driver’s License.):

  • Inkan (印鑑 inkan) – nifty little stamp with you name in Japanese
  • Alien Registration Card (外国人登録証明書 gaikokujin tōroku shōmeisho)- Government issued card stating who you are, and what you are doing in Japan
  • Proof of Parking (車庫署名賞 shakoshōmeisho)- Only if you get a white plate (explained later)
  • International Drivering Permit (IDP) or Japanese Drivers License
  • Money for the car, the mandatory car inspection for the car and possibility a deposit for the parking spot depending on your apartment.

Types of Vehicles

  • Yellow Plates (軽自動車 keijidōsha “K-cars”) Smaller vehicles, with engines that are less than 660cc. Extremely popular because of the huge tax breaks associated with them. Easy to park, cheaper to own, excessively small.
  • White plates Easily identified by their white license plates. Probably the car you are use to at home, able to climb hills, pass other cars and come in different shapes other than cube and sphere. White plates are cars that have an engine larger than 660cc. White plates may offer you that va-va-va-vroom feeling, added cargo space and “did you just see that (insert luxury vehicle name here) go by” mind-set, but can be more expensive than Yellow plates.
  • Scooters offer an inexpensive alternative to getting a car. You can find a sufficient, used, “one seater” for about 50,000円. To drive a scooter you do need your international driving permit.
Car TypePrice to buyInsuranceParking RequirementRoad Tax per yearFull Tank Cost
Yellow PlateAround 300,000円 or more for a good used car(bargains in the 100,000円 range sometimes)Slightly cheaper than white.4,000円 a monthNo proof required/ usually no deposit (in bigger cities most parking spots are not included in your rent)Cheaper than white, usually less than 10,000円3,000円
White PlateAround 250,000円 or more for a good used car(bargains under 100,000円 common, but do not include shaken)Full insurance about 5,000円 a monthProof of Parking required(車庫署名書 shakoshōmeisho)Ranges from about 30,000 up to 90,000 depending on you car (usually about 40,000)5,000円
Scooter50,000円 and up10,000 to 30,000円 a yearNo proof requiredAround 3,000円700円

Where to Buy

There are several places on the island to get cars. One of the easiest ways is to ask a teacher (some even have free cars to give away). Websites are tricky to navigate if you don’t know Japanese, but have a teacher or co-worker help you. Also look around your neighborhood–I found my car about 2 blocks from my house. Not only is it easy to get the paperwork sorted out if you stay in the neighborhood, it’s also easy to get repairs and maintenance done. And last but not least, ask a JET or see if any previous JETs are selling their car.

www.car-ciao.net (Japanese only)
www.o-cross.net (Japanese only)
JapanUpdate.com Classifieds, a website mainly used by military people that are selling items because they are moving

Don’t forget to get Optional Insurance!

JA共済 (Japanese only)
SBI Insurance (online application, Japanese only)
ACE (Kumoji Branch, Japanese only)


Changing Car Ownership

The process of changing ownership of a car when you buy one second-hand is called “meigi henko.”

Necessary Documents

  1. If the car is a white-plate you need a Certification of Parking Space (車庫証明 shako shomei) from your local Police Station (get inkaned proof of your parking space from your landlord and take it to the policestation). The police will usually confirm that the parking space is valid by visiting the space themselves and then give you a sticker for your car and certification.
  2. Your inkan and if it’s a white plate you also need a Proof of Inkan Certification (印鑑証明書inkan shomeisho) from your local municipal office.
  3. Your IDP, driver’s license, and Residence Card.
  4. The inkan and Proof of Inkan Certification of the person you are buying the car from.
  5. Proof of Payment of Automobile Tax (自動車税納付証明書¸ jidoshazei no fushomeisho) from the person you are buying the car from.
  6. Car Registration Certificate (車検書 shakensho) from the person you are buying the car from.
  7. Compulsory Automobile Liability Insurance Certificate (自賠責保険証¸ jibaiseki hokenshou) from the person you are buying the car from.

Take all of this stuff to the local Land Transportation Office (陸運事務所 rikuun jimusho) and they will give you forms tofill out. Have you supervisor (or someone who speaks Japanese) to call before hand to make sure you have all the correct papers. It will probably take around 10 days to complete the entire process if you are buying a white-plate, or 1 day if you are buying a yellow-plate.

Okinawa Land Transportation Office (沖縄陸運事務所)
512-4 Aza Minatogawa, Urasoe-shi,Okinawa-ken 901-2134
〒901-2134沖縄県浦添市字港川 5-12-4
TEL: 050(5540)2091 FAX: 098(876)7233 Closes at 4:00 pm

Miyako Land Transportation Office (宮古陸運事務所)
1037-1 Aza Shimozato, Hirara,Miyakojima-shi, Okinawan-ken 906-0013
〒906-0013沖縄県宮古島市平良字下里1037-1
TEL: 050(5540)2092 FAX: 0980(73)3861

Yaeyama Land Transportation Office (八重山陸運事務所)
863-15 Aza Maezato Uehara,Ishigaki-shi, Okinawa-ken 907-0002
〒907-0002沖縄県石垣市上原字真栄里863-15
TEL: 050(5540)2093 FAX: 0980(83)5065

To Leaving JETs: If your successor will not arrive before you leave then you will need to get somebody to do all of this on your behalf, in which case you may need to organize a letter of attorney to empower them to do so. Without a legal power of attorney, you are just trusting that person on good faith that everything will get done, so please choose carefully and get everything ready for them so that it makes their job easier. And of course, please show your appreciation after everything is finished. Please also note that necessary forms may vary by municipality, so it would be best to check with the Land Transportation Office beforehand to confirm which forms will be required.


Safety Inspection (Shaken)

All vehicles must undergo a periodic vehicle safety inspection called jidōsha kensa (自動車検査) or “shaken” (車検) for short. Frequency is usually every two years, but may be more frequent for older vehicles. (A new vehicle will undergo the first inspection three years after purchase.) Costs will vary depending on the age of the vehicle and the size of the engine, ranging from 100,000円 to 150,000円 or more. A certificate and sticker will be issued for vehicles which pass the inspection. The certificate of inspection must be carried by the driver at all times while driving and the sticker displayed on the front windshield. You will be provided a replacement car when you take your car in for the inspection.

Kobac (Gushikawa, Urasoe, Okinawa City, Itoman, Chatan)

Relatively cheap Shaken that offers a lot discounts such as referral, 1 month early appointment, payment by cash and more.

Yellow Hat

Autobacs


Junking/Recycling Your Car

Junking or recycling is an excellent way to be rid of your damaged or otherwise unsellable car. Many garages or insurance companies offer junking services, but these may come at a price, especially if your car requires towing. Others are free, but you receive no compensation for the scrap metal. Also bear in mind that while there exist several junking guides for SOFA residents, JETs are civilians and therefore the process has some differences. It is, however, relatively easy to do on your own.

There is the potential to turn a tidy profit if you do the legwork for junking yourself. However, seeing as the locations necessary are in the central and southern parts of the island (Chatan and Urasoe, specifically), it may be less stressful for a northern JET or outer islander to simply pay a garage or seek out a free service to dispose of the vehicle rather than spend the time and effort of driving back and forth.

Necessary Documents
Before heading to the junkyard or LTO, you’ll need to make sure that you have:

  • A current shaken 車検 (Japanese inspection tax that consists of two parts: the sticker beside your rearview mirror and a green-patterned certificate in your car’s registration)
  • Your inkan, should you have one. Otherwise, a signature will do.
  • An up-to-date jidōshazei 自動車税 (Car tax, different from shaken, paid annually. Look for the small white slip with your car’s paperwork – it comes from City Hall around April/May.) (E/N: I, personally, may or may not have been three days overdue on my car tax, but I was not made to pay at the LTO.)

Step 1: The Scrapyard

There are several auto recycle centers on Okinawa, and their function essentially the same, but for the ease of example, this article will reference Miyagi kaitai in Chatan.

Miyagi Scrapyard (宮城解体)
245 Sunabe Chatan Okinawa 904-0111 Japan
Hours: 08:30-17:30 Mon-Sat (12:00-13:00 lunch)
Closed on Japanese Holidays
098-936-4903

Miyagi Scrapyard is easily accessed and easy to navigate. Heading north on Route 58 from American Village, turn at ‘Sunabe’ (砂辺) intersection. The main gate is straight ahead. Parking is immediately to your left after the fence (and a bit limited), but you won’t need it long. Park your car and take your shaken in to the main office, which is a small, squat building on the right with a difficult-to-miss enormous arrow and the label ‘MAIN OFFICE’ on its side.

The staff speaks variable English, and should be able to communicate the basics to you. Hand them your papers, and they will calculate the price of your car based on the weight listed on the registration and the current rate for scrap metal. (E/N: My 2001 Suzuki Wagon R was roughly ¥14300.) They will then produce a rusty bucket for you to borrow tools from in order to remove your plates and any tax stickers. Your plates may have aluminum seals over the screws that have the Okinawa Prefecture seal (the ‘oki’ kanji). If necessary, pierce them through to get to the screws beneath and remove them. Keep the seals. Using the scraper tool, remove the tax stickers from your windshield and bring everything back in to the office.

At this point, you will get three things: cash payment, a receipt, and a second ‘recycled’ slip that will be stapled to your shaken. It’s the same color and print, but bears a large red stamp as well as the stamp of the junkyard. Take your plates, seals, stickers, and augmented shaken, and you’re finished.

Total time taken: 10-15 minutes

Step 2: The LTO

It is highly recommended that you begin the process two weeks before your car must be de-registered.

This second step cannot take place until your car has been processed, crushed, and recycled. This can be up to a week (or more) after you dropped the car off, but you cannot de-register your car without knowing the exact date it was completed. Call the junkyard and ask, being sure to write down the completion date. Once that is finished, you can go to the LTO.

Okinawa Land Transportation Office (沖縄陸運事務所)

512-4 Minatogawa, Urasoe, Okinawa

Hours: 08:45 – 04:00 Mon-Fri (11:45-13:00 lunch)

Closed on Japanese holidays

050 – 5540-2091

Edited as of 6/18/14. The LTO is also fairly recognizable. When in Urasoe on Route 58, turn at the intersection with the Pharaoh pachinko parlor. (There will be a sign at the intersection.) Follow the signs to the LTO, taking a right down a small hill and following the road to nearly the very end. You will pass a large walled-in parking lot and the main LTO building on your left. Immediately after the parking lot walls, take a left. Take a right into the opening marked “Gate 1,” and park here. (E/N: There are no English-speaking staff in the offices we need. If you’re in trouble, you can go to the main building and go to the window marked ‘Military’ to talk to an English speaker, but you might have to wait a while for help and they won’t be able to process the paperwork for you at that window.)

What you will need:

  • Your shaken and attached recycling slip
  • Your license plates
  • Your inkan, if you have one
  • Your bank card and home branch name (where you opened your account, usually)
  • Knowledge of how to write your name and address in Japanese

LTO Part 1

Directly after the gate on your right, there will be a brown brick building, and next to it is the Small Vehicles Office. It’s white and has almost no signage. Go through the first door, which will be unmarked and close to the brown brick. You’ll see a series of numbered counters. The farthest right will be window 7. Beside it, you will see a large machine with metal indents inside. Put both license plates in faceup, and the machine’s screen will display the plate reading. If it’s correct, touch the ‘yes’ button and take the sticker that prints out.

The staff at the window will give you a piece of white paper and tell you what to write and where. This one’s easy – the sticker goes down at the bottom, and there are two spaces at the top for your name and license plate information. If you can write your name in katakana, the kanji for ‘Okinawa,’ and the hiragana on your plate, you’ll have no problem.

LTO Part 2

Go to the next counter, window 0. (Yes, zero.) Give them your shaken, recycling slip, and license plate paper. They’ll tell you what to write and where, and it’ll be mostly serial numbers. Poor spoken Japanese is okay here; they’ll circle what you need to write and indicate it on the forms. If you have any remaining time on your shaken, they’ll need you to also fill out a furikomi (money transfer) form. That’s where you’ll need to know your bank name, home branch name, and bank number (embossed on your cash card). You’ll also need to write your address in kanji three or four times here. Fill it out on one of the tables, then bring it back and they’ll double-check it for you.

LTO Part 3

Go two windows over to number 3 and put the bundle of papers clipped together into the basket and wait for your name. Pay 300 yen, then wait again at window 2. They’ll check the papers and might ask you for more information, like phone number or other details. Finish all the little stuff, then take your papers with you and go to the last section of the office.

LTO Part 4

There will be a touchscreen number ticket dispenser on the left. Press ‘1’ and get a number. Detach the top half and stick it under the paperclip, keeping the matching bottom half for yourself. Drop the papers off in the basket at window 1 or hand it to the clerk, then have a seat and wait. When your number is called, you will receive a copy of your shaken and white paper with your plate numbers on it, stating that your car has been de-registered.

Total time taken: 30-45 minutes

Step 3: Insurance

In the easiest step of all, stop by your insurance company and close out your coverage, as you may be entitled to a refund.

Bus System

Taking the bus may seem intimidating if you are not used to public transportation or cannot read Japanese well. Don’t worry. Many foreign residents and tourists successfully use Okinawa’s bus system. It just takes some getting used to. In this article, you will find links and advice that will help you become a public transit pro!


Public Transportation vs. Buying a Car

While your predecessor, other OkiJETs, and/or your coordinator may highly encourage you to buy a car, the ultimate decision rests in your hands. There are many things to consider: your finances, getting an IDP and later a Japanese driver’s license, the brutal summer heat, etc. Okinawa has a pretty well-developed bus system, so you can always decide later whether a car (or scooter, motorcycle, bicycle, or public transportation) is best for your lifestyle.

After you arrive in Okinawa, you will be expected at work the next business day. If you can walk to work from your apartment, you won’t need to worry about the bus system or buying a car until later. However, when searching for apartments, do consider the parking situation and what public transportation is accessible.

Don’t be discouraged by what some people will tell you about the bus system; it is pretty reliable, and drivers are very helpful. If buying a car is not feasible when you arrive, below is a guide to the bus system in Okinawa.

OKICA

OKICA is an IC card that can be used on the monorail and on buses in Okinawa (among other things). OKICA is the only IC card that can be used on buses in Okinawa. See the website for how to purchase an OKICA.

When boarding the bus, rather than taking a ticket, you can tap your OKICA. Tap the IC card again when you deboard the bus. However, you must add money to your card before using it. See the website for explanations on how to charge your card on buses, at monorail stations, and at charging machines.

Some JETs might want a registered OKICA. In some cases, having a registered OKICA may make reimbursing commuting expenses easier. However, this will depend on how and if your contracting organization reimburses travel. If your OKICA is registered, it also makes it much easier to recover if your card is ever lost—and you’ll even get your name printed on the card, yay!

Planning your Bus Route

When planning your bus route, the first hurdle to overcome is determining which bus to take. There are four different bus companies operating in Okinawa. They are: Okinawa Bus, Ryukyu Bus, Naha Kotsu and Toyo Bus.

If your Japanese reading level is low, I recommend:

  1. Inputting your starting point and final destination into Google Maps (use your native language if you would like).
  2. Using Google Maps, find the bus route that will get you to your destination. Note the route number and the bus stops where you will board and deboard the bus. Double-check the bus route using the links in “Resources for planning your route.” Sometimes Google Maps is not up to date.
    1. Transferring might be stressful, so in Route Options I recommend selecting Fewest Transfers. You can also choose the time you would like to leave your starting point or the time you would like to arrive at your destination. However, the buses in Okinawa are rarely on time, so leave a buffer.
  3. Before you set off for your bus stop, (1) check the street view of the bus stop in Google Maps so you know what your stop looks like and (2) check のりものNaviOkinawa to see where your bus is. This webpage is in Japanese, but you only need to (1) select your bus route (the number of the bus you will ride), (2) select the direction of the bus (up or down), and (3) select 全停留所表示 (show all stops). Then find your bus stop’s name and where the nearest bus is in real time. You can also see all of the bus stop names on the route.
  4. Once you arrive at the bus stop, look at the bus stop sign. At each bus stop, there is a list of the buses that service the stop and their schedules. Confirm that you are at the right stop.

Resources for planning your route

  • Okinawa Bus List of Routes, Naha Kotsu Bus Company Maps, Ryukyu Bus Route Search (ルート検索), Toyo Bus Route Information (運行系統案内)
  • This page has a really useful animated map that shows bus routes.
  • If you can read Japanese well, I use the バスNAVITIME app to double-check my routes. It is all in Japanese, so it might be difficult for beginners (download for Apple and Google).
  • Okinawa is notorious for traffic, especially on rainy days. On the のりものNaviOkinawa webpage, you can track your bus in real time.
  • This page shows the route for the Yanbaru Express Bus, which specializes in going from the airport to the Northern part of Okinawa. You can head all the way up to the Okinawa Churaumi Aquarium using this bus.

On the Bus

First-time bus riders, please check out these links! The Okinawa Bus company has a description of how to ride the bus in English with pictures. While the buses may look a little different, the process for riding local buses is basically the same among all the bus companies. Ryukyu Bus also has a page explaining how to ride the bus (in Japanese) with pictures. Watta Bus has its own infographic (available in multiple languages) and great videos in Japanese and English. These videos explain bus manners and how to board and deboard the buses.

Below is the general procedure for riding local buses:

1. When you see your bus approaching your stop, line up to board the bus. Most of the time, you board and deboard using the door at the front of the bus.

2. Wait for those on board to exit first. The bus driver will say “Douzo” when all is clear.

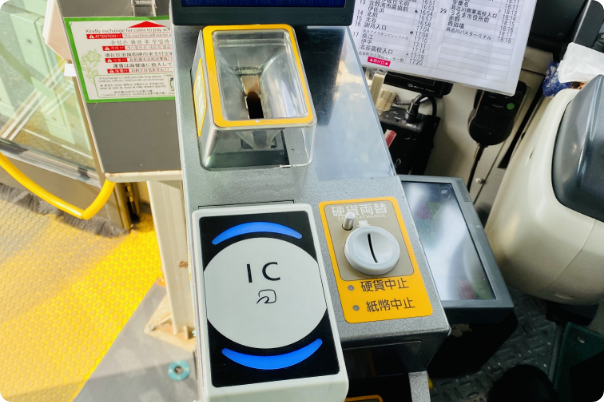
3. Tap your OKICA IC card or grab a paper ticket when you board the bus. The paper ticket will have a number on it, that number will determine your fare when exiting. There is a screen at the front of the bus with many numbers. Match the number on your ticket with the number on the screen. That’s the fare you’ll pay once you reach your stop.

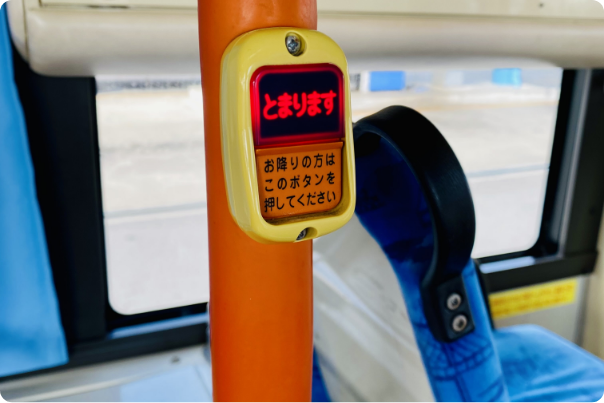
4. Press the button before your stop to signal to the bus driver that you will get off at the next stop. While riding, there is an electronic voice that calls out the stops (in Japanese). There might also be a screen near the front of the bus that lists the next few stops and the final destination (in multiple languages). But, not all buses have a screen like this. Once you have pressed the button, it will light up.

5. Before deboarding, tap your OKICA or drop your ticket and exact fare (yen only) in the fare box. If you don’t have the exact fare, there is a change dispenser at the front of the bus that gives change for 1,000 yen bills, 500 yen coins, and 100 yen coins. Use the change dispenser and then pay your fare.

This is the source of the images used above. These things may look a little different depending on the age of the bus and the company.

Useful Japanese for Riding the Bus

JapaneseEnglishNotes
バス停Basu teiBus stopSearch バス停 in Google Maps to see nearby bus stops (in Japanese).
次は___でございます。Tsugi wa [bus stop name] de gozaimasu.Next, is [bus stop name].After hearing this announcement, press the button if you want to get off at the next stop.
次は__です。Tsugi wa [bus stop name]Next, is [bus stop name].If the bus has a screen for the stop names (not the fare screen) it will display the name of the next stop like this.
次、止まります。Tsugi, tomarimasu.The bus will stop at the next bus stop.After the button is pushed this will be announced.
このバスは_に行きますか? Kono basu wa [bus stop name] ni ikimasu ka?Does this bus go to [bus stop name]?Ask the bus driver this question to confirm you are boarding the correct bus.
チャージをお願いします。Cha-ji o onegaishimasu.Charge, please.Say this to the bus driver when deboarding the bus to add money (using cash) to your OKICA. Then pay your fare.